
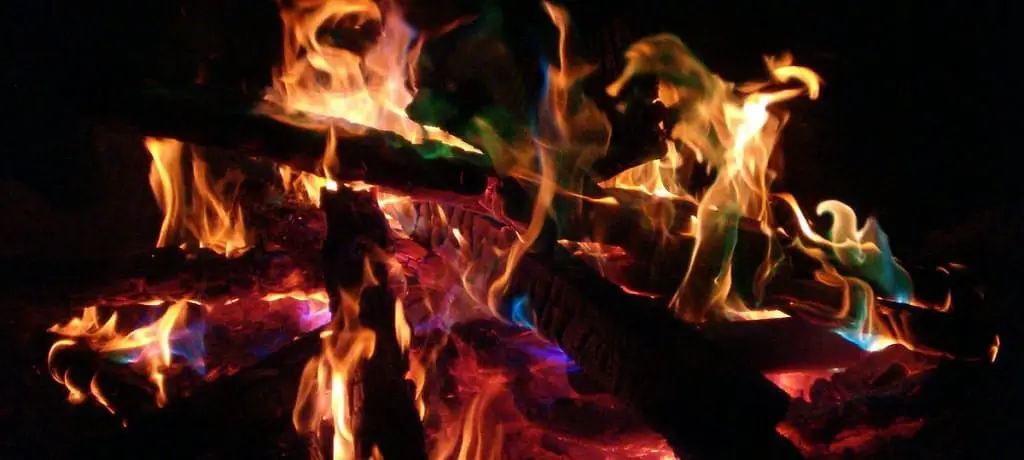
I will never forget the first time I saw a color-changing bonfire. It was on a trip to Europe with my family when I was merely ten years old. The guy who made the fire had suddenly, at some point, tossed a mysterious powder into the flame. With seconds the campfire was glowing with breathtaking, green colors. With that memory in mind, I’ve decided to write an in-depth article on how to make a campfire change colors.
Here are five techniques to make a campfire change colors:
- Add chemical compounds to the fire.
- Use special kind of woods (driftwood for a purple flame, for example)
- Soak wood, paper & pine cones with chemicals beforehand.
- Create wax patties containing particular substances.
- Buy a few color changers upfront.
1. Adding Chemicals Directly to The Fire
According to this source, some chemicals can make the campfire assume a different color when added to it. However, you have to be careful about your timing, as they should not be added to the fire when you are cooking, or when it’s windy.
These chemicals also tend to create some bit of smoke, that is why adding them to the campfire when there is wind is not such a good idea. Otherwise, these are chemicals you can buy readily from dry goods stores and even the grocery store.
Additionally, they are not always labeled as chemicals that are used to change fire color, as some of them have other uses besides making your campfire look more exciting and magical.
For instance, copper sulfate, which can make your campfire green, is sold as a swimming pool supply. Similarly, Epsom salts, borax, and calcium chloride are sold as laundry and cleaning supplies.
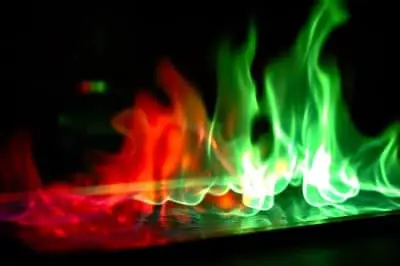
Another way to achieve a green flame is to add borax into the fire. This particular chemical produces a bright green glow. Alum also make the flame appear green, just like copper sulfate does.
Anyway, in addition to copper sulfate, making the campfire look green, copper chloride can give it a distinctive blue color. To create a white campfire, you can add magnesium sulfate into the fire. And for a red flame, adding lithium chloride or strontium chloride can do the trick.
To get an orange flame, you can add calcium chloride to the fire. You don’t always need to shop for an unfamiliar chemical to make your campfire have a new color. For instance, table salt, or sodium chloride, can be used to give your campfire a yellow flame.
Chemicals Summary
For your convenience, I’ve gathered you the mentioned colors and chemical in a table. Make sure that you get the compound’s name correctly before you buy it.
| Color | Chemical |
| Green | Copper sulfate, Epsom salts, Borax, Calcium chloride |
| Blue | Copper chloride |
| White | Magnesium sulfate |
| Red | Lithium chloride, Strontium chloride |
| Orange | Calcium chloride |
| Yellow | Table salt, Sodium chloride |
Instructions & Safety
Note that you might have to add the chemical to the fire a couple of times before the flame starts to change color noticeably. With some chemicals, it can take up to a minute before you notice any color changes.
Therefore, you have to be patient with this process, as well. However, in some cases, the color changes happen immediately. Generally, you should start by testing how the fire will react to the chemical you add to the flames.
This usually involves throwing a little pinch of the compound from a safe distance to see how it goes. You should do this from a safe distance in case the fire responds explosively (according to wikiHow).
Since you are doing a test and safety is the most crucial factor, you can put a little of the chemical to the edge of the fire so that you avoid getting too close in case a flare-up happens. While at it, you can wear fire-resistant gloves and safety glasses.
These chemicals can also produce irritating smokes that can be a problem for people with breathing issues. In such cases, using a breathing mask is advised. That said, you can also stay off the direction of the smoke.
2. Using Special Kind of Woods
Some types of wood will help you achieve the colored campfire flames you desire naturally, without having to shop around for any chemicals.
A perfect example is a driftwood, which is usually found near beaches. This particular kind of firewood will produce a very captivating blue to purple flame (according to ThoughtCo).
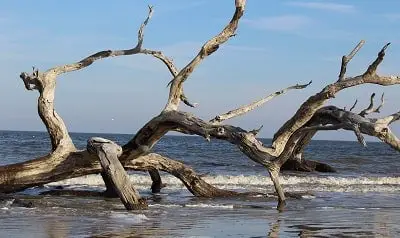
It does this because it grows near to the ocean, which has salts which soak into the wood and give it this effect as it burns. However, be aware that this wood also produces smoke that is not mainly the best for breathing.
Consequently, use the wood only with outdoor campfires. Additionally, avoid windy nights as the smoke will be blown all over your faces, which is not good. However, when used on a clear night, the color effects it produces can be remarkable.
3. Soaking Wood, Paper & Pine Cones With Chemicals
Actually, this does not just apply to the wood you use to make your campfire but to things like pinecones and other things as well, although wood is without a doubt the most popular material to use.
You can also soak newspapers into the chemicals so that the flames change color when you add them to the fire. So, generally, any kind of kindling materials are suitable for this process.
Mixing & Container Picking
During this process, you should mix the chemicals into the water, using a plastic container and then stir the compound until it mixes appropriately (according to this source).
Although it can be tempting to combine a bunch of chemicals, you should use one compound in each container. You should use a plastic container and not a metal container, which might react with the chemical. Glass is also good enough.
Additionally, you should try not to come into contact with the solution you are making or the fumes, which is why you should wear gloves and even safety glasses. A respirator can also help in case the chemical in question ends up producing any fumes. Also, do the mixing outside.
Anyway, once the chemical solution is ready, you should soak the wood or the fuel material in it for 24 hours. You can put the logs into a mesh bag, such as an onion bag before submerging it into the container.
Drying The Wood
Once the wood has soaked for 24 hours, you can remove it from the mixture and allow it to dry. But first, enable the solution to drain away before putting the wood somewhere to dry.
This should also take about 24 hours. If the pieces of timber fail to dry appropriately, keeping them alight will be a challenge, and you will have to deal with unnecessary smoke as well.
Otherwise, you can use your dry and treated pieces of wood in your campfire, and you will get the colored ire you want. However, you should be careful about using the treated firewood in indoor spaces as they might produce a special kind of smoke that might be hazardous to those enjoying the campfire.
4. Adding Wax & Chemicals to The Fire
Sparks Effect
To achieve the expected results, you have to add the chemicals or other substances correctly. With some materials, you should sprinkle a little bit into the fire and notice the uniquely colored sparks rise from the flames.
For instance, when adding sugar to the fire to make the light produce tiny sparks.
At other times, you can toss a little bit of the substance to the fire. This applies to things like flour, which makes a flash flame, and even iron filings, which create gold sparks in the bonfire. Powdered aluminum and magnesium shavings, both of which give the fire silver sparks.
Permanent Color Effect With Wax
However, throwing the chemicals into the fire creates a temporary effect, as the color quickly fades away as soon as the chemicals burn up.
Nevertheless, in case you need to create a more permanent color effect, you have to use a different approach as you add the chemicals into the fire.
One way is to use wax patties consisting of the chemicals that generate unique color effects. But understand that wax patties will not work with sparks, although they are excellent with chemicals that can have a unique color effect on the fire (according to RVshare).
To create the wax patties, you should melt old candle wax and pour it into paper dixie cups containing the chemical in question and stir with a small rod so that the compound mixes properly with the wax.
After that, you should let the candle wax cool down before peeling off the sides of the paper cup. From there, tossing any of these cups into the hottest part of the fire will generate flames with unique colors for much longer.
You can even try to make the light have a different color in each section by tossing candle wax mixed with the chemical into each section.
5. Using Fire Color Changers
Generally, the chemicals that campers use to change the colors of their campfires are not sold individually for that purpose. Using them to create exciting campfires is a way of repurposing these compounds, and you have to shop for them in different places. Clearly, this can be quite a chore.
For instance, sodium chloride is easy to get, as it is regular table salt, and there are plenty of places to buy it, including the local supermarket. However, you would have to pay a visit to the pharmacy to get your hands on magnesium sulfate.
Similarly, to get copper sulfate, you would have better luck at a hardware store. Chemical supply stores are also an excellent place to search for these chemicals, and they can sell you things like alum, lithium chloride, sodium carbonate, copper chloride, and so forth.
You can avoid all this hustle if you are not up to the challenge of buying the different chemicals needed to make your fire change color (or the DIY project of mixing chemicals with fuel) by buying fire color changers.
These products work very effectively, and they are easy to use. Additionally, you can get lasting color change effects that can last for up to an hour, which is pretty cool (according to SkyAboveUs).
All you have to do is to search for the query ‘fire color changer’ on Amazon, Google, etc.
Obviously, there is a right time to start adding things into the fire to change its flame color. First of all, there should be a relatively big flame going on, and it should be about a foot high for the best results. Also, it is an excellent idea to let it burn until all you can see red embers below it.
How to Make a Fire Suitable to Change Colors?
To ensure you have the proper campfire for various colors, you should make sure the flame produces enough heat and that it lasts long enough. If the fire doesn’t feature extreme high temperatures, it is less likely for the materials to burn and produce the desired glow.
To achieve that, I recommend that you use a Finnish Gap fire. I’ve discussed that technique in another article, in which I’ve listed 9 tips on how to make a campfire burn all night.
This article would help you to build a long-lasting fire which would be suitable for the color changing process and would definitely keep you warm through the night.
Also, it is essential that you make a fire which produces minimal smoke. Otherwise, the chemicals you will be using might get to your lungs and irritate your airways.
For that, I highly suggest you read the article I’ve written which answers the never-ending question; why does my campfire smoke so much. In there, I’ve listed all the possible reasons for the scenario and brought more than five years of experience to help you reduce it.
How to Prepare The Area For a Color-Changing Fire?
First, make sure you pick an area which isn’t exposed to the wind. I understand it is a strict requirement, although it is essential that you keep the wind to the minimum.
Strong winds might drift the burnt materials towards you and cause inconvenience. Pick an area which features trees, building walls, hills, etc.
Avoid open spaces such as deserts, uphills, and shores. Also, make sure that you pick the right stones for the bonfire. When you choose the wrong ones, they might pop up and toss the chemicals upon your skin.
I’ve been discussing that issue on another article called how to avoid exploding campfire rocks. I highly suggest that you take a look at this so you learn which stones might cause you troubles and what should be the proper alternative.
Conclusions
Making your campfire change colors is possible, and not merely on movies. All you have to do is to pick the approach which is right for you. If you like the DIY process, you could purchase the desired materials listed above and add them to the bonfire or the logs themselves.
On the other hand, you could buy a few color changers which were pre-made just for this purpose. Either way is okay, as long as you pay attention to the burning process. Make sure that you pick the right spot and avoid the wind as hard as you can.
Also, use the listed techniques to create enough heat for the colors to actually change through the combustion process. I hope my article was helpful to you. If you have any new insights of your own – let me know all about them by leaving a comment below!