

During the few climbing expeditions I’ve done, I wore my climbing harness the way it made sense to me. I knew where the legs should go and approximately where it should be seated on my hips. Nevertheless, exactly where should a climbing harness sit was obscure. That was when I decided to dig a little deeper into it. After five hours of research, I’ve summed up where each par
A climbing harness should sit in a way the waist belt, along with the gear loops, overlap your upper hip bone. The belay loop should be beneath your belly button, and the leg loops must lay on your upper thighs. Also, the cross-line sits typically in the pubic area, and the haul loop should overlap your spine.
1. Waist Belt
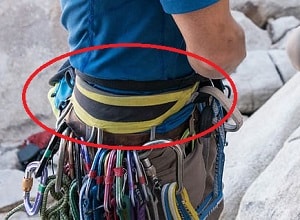
The waist belt should sit over the most substantial part of the hip bone, which is known as Iliac crest (source). The iliac crest is also the top-most part of your hip bone.
The waist belt should be in such a position that it partially overlaps this area of your body. When that is the case, you can get a proper hold and attach yourself securely to the climbing gear.
While wearing the harness, the waistbelt will always be on top. Hence, once you adjust the waist belt in place, you can be sure that the placement of the rest of the gear will fall in place. It works as a guide for keeping the other parts of the harness in place.
2. Gear Loops

The gear loops protrude downwards from the waist belt, and they should be directly over the hip bone. If they extend beneath that line, it indicates that the waist belt is not sitting in the right position.
When you haven’t attached any gear to the gear loops (their stationary position), they will directly be on the hip bone. However, once you connect the climbing gear, the gear loops should protrude a bit downwards.
3. Belay Loop

The belay loop in the stationary position should be just beneath your belly button. Relatively, the placement of the belay loop should be a few inches below the waist belt at the center.
Before attaching any belay device to the belay loop, it is a good idea to verify if it sits in this position or not. If it is above or below this position, it is better to adjust it to position the climbing harness properly. This way, you get a more efficient climbing experience and won’t be wasting more energy than necessary.
However, once you attach the belay device, the loop will protrude upwards and forwards to a point it is above your belly button and no longer touches your body.
4. Buckles
The buckles of the climbing harness are attached to the waist belt. When climbing, you have to move the straps through them to tighten the waist belt. Many of these buckles require a double-back strap position. This means you have to move the strap through the waist buckles twice.
The position of the buckles should be such that they are not at the end of the waist strap. If you are required to max out the waist strap while trying to wear the harness, it might not be of the right fit for you. In that case, you need to think about replacing the harness itself.
5. Leg Loops

If the harness is in the right position, the leg loops should sit on the upper thighs. If they are lower and close to the knees, it indicates that you’re not wearing the harness appropriately. So, it becomes imperative to adjust the leg loops position.
It is the job of the leg loops and waist belt to disperse the pressure on your body. That is why they must be in the right position. If they are too close to the knees, they will exert excessive weight, which can result in an injury or pain.
6. Tie-in Loops

The tie in loops are attached to the belay loop. The upper ones attach the belay loop to the waist belt, and the lower ones connect it to the leg loops.
When you attach your belay or rappel device to the belay loop, the rope should be attached to the tie in loops. Since these loops are also the point of contact of the body with the climbing gear, it is essential to ensure that they are firmly sitting at their proper position.
The thing about these loops is that their position is related to the belay loop. Hence, all that matters is that the waist belt and the leg loops are seated right.
Ideally, the upper tie in loops should have some overlap with the waist belt, whereas the lower one should not overlap the leg loops. If the tie-in loops suffice these conditions, you can be sure that they are sitting in the right position.
7. Cross-Piece
The cross-piece is responsible for connecting the leg loops to the tie in loops. The thing about the cross-piece is that it is adjustable; according to your height, you can elongate or shorten it. Usually, the harness comes along with threads for adjustment.
The ideal position in which the cross-piece should sit is just below the lower tie-in loops, in the pubic area. However, if you extend it more to make the climbing harness a bit longer, it is okay.
Taller individuals need to do this to ensure that the climbing harness can fit their physique. Thus, cross-piece is a part of the climbing harness whose position is relative to your height.
8. Haul Loop

The haul loop protrudes upwards from the top end of the waist belt. If it is positioned in the right way, it should be overlapping your spine. The design of the haul loop is such that it rests over the vertebrae.
Another thing to avoid is that the haul loop should not fall into the waist belt itself. It should consistently protrude upwards.
The haul loop is nothing but stitched webbing. The job of this webbing is to connect the harness to the second rope. It does not have the same load-bearing capacity as the tie in loops, but it definitely facilitates the attachment to a second cord.
Are you still confused regarding where the climbing harness should sit?
If yes, you can go through my guide above to verify the position of each part of the climbing harness. Once all of these tick the boxes, you can be sure that the climbing harnesses sit in the right place.
How to Test Your Harness After Wearing it?
Follow this procedure before you begin the climb (source). It will help you ensure that you wear the harness in the right way. The process for testing the harness is as follows:
Step 1: Hold it Tight
Most climbing harnesses consist of D-rings; hold your harness by these. Tightening the harness with the help of these rings will ensure that all the straps come in their respective places. It will also alert you to any open buckle or fasten it if necessary.
Step 2: Give it a Violent Shake
When you give your harness a violent shake, you can identify the loose straps right away. I have often discovered open buckles as well by doing so.
It is crucial to know about these before beginning the climb; otherwise, you might end up with an injury. If, by any chance, you’ve noticed flaws, fix them and go back to step 1.
Step 3: Visual Inspection
The next step which you need to accomplish is to inspect the harness visually. If you are new to climbing, you might be thinking, what I should look out for? I will help you with the same as well.
You need to find the answers to the following questions:
- Is the harness torn?
- Are the D-rings of the harness proper, or are they cracked?
- Are the buckles in appropriate condition?
- Have any loops undergone deformities?
- Are the rivets in suffice state?
Once you find the answers to these questions, you should get a general estimation of your harness condition. If there is a problem in the harness, it is better to replace it right away.
Any signs of deformities or damage can put your safety in jeopardy. Due to this very reason, a visual inspection can help you in more ways than one.
How do You Adjust a Fall Protection Harness?
Many times, once you start your climb, you might need to readjust your harness. Especially for climbers who are new to the art of climbing, adjusting the harness again and again might be required.
Fortunately, the procedure to do so is quite simple. I will go into the details of this procedure below to help you understand how you should adjust it.
Step 1: Reach a Convenient Area
You need to ensure that you are on a stable platform. Avoid being hung by a rope or a belay device while adjusting your harness. Only when you’re on firm ground, you are good to go.
Step 2: Find The Problematic Part
The discomfort which you experience will determine the part of the harness which you need to adjust. You need to ask yourself questions like:
- Is the harness tight enough around the waist?
- Are the leg loops too tight?
- Is the attaching mechanism not in the right place?
Depending on these questions, you will know right away which part you need to adjust.
Step 3: Adjust Your Waist And Legs
In case there is tightness around the waist, you can open the waist buckles and readjust them. You can reduce the length of the strap, which is double backing into the buckle.
Similarly, if the attachment mechanism is not in place, adjusting the position of the leg loops with respect to the waist belt might be necessary to ensure that the attachment mechanism strap is not maxing out. Once you do so, the attachment mechanism will be in the proper place.
If the leg loops are too tight, loosening them up should be quite easy, as well. You may practice how to do so beforehand, so you will be prepared.
Step 4: Retest Your Harness
Once you readjust the harness, it is essential to test it for security. I have gone into the details of the procedure to check it above.
I would suggest you complete the readjustment as well as the testing procedure before resuming the climb. Only once you do so, you can continue your climb without risking your safety.
What Problems Can You Experience if The Harness is Not in The Right Place?
Now that you are aware of the placement and positioning of the climbing harness, it is necessary to know the problems which you can expect otherwise. If the climbing harnesses not in the proper place, it can create problems during your climb.
These problems include:
- The first problem is that you will feel excessive pain around the leg loops and waist loop. It is because the pressure does not distribute properly.
- Another issue which you will face is that the climb will require more energy on your part. Due to this very reason, you will get exhausted more quickly. In certain extreme conditions, it can cause the harness to malfunction as well.
- In the longer run, if you’re not wearing the harness properly, it can wear out the harness as well. The weight carrying capacity of the harness and the ability to handle shocks and vibrations will gradually reduce if you’re not wearing it in the right fashion.
- In case the harness is not sitting in the correct position, you can suffer from an injury. It can happen when you experience a fall, for instance. This is the most severe scenario which you have to avoid by all means.
As you can see, the side effects of not properly wearing the climbing harness are plenty. So, you must ensure that you follow every step correctly, as I have highlighted above.
Conclusions
Ensuring that the climbing harness is in the proper posture is necessary to disperse equal pressure on your body. Also, it will allow you to go through your climbing expedition without any injuries or excessive force on your body.
The climbing harness consists of different parts. If you want to make sure that it is sitting in the right position, it is essential to check the placement of various components of the hardness.
The most noticeable part is the waist belt. It should be over the iliac crest. However, there is more to the climbing harness than just the waist belt (source).
That is why I went through the details of the placement of each part of the climbing harness. Once you do follow it, there is no room for error.